
How to make a leather pattern from measurements
Make a leather pattern in 7 steps: measure the object, list the pieces, add the stitch line 4 mm inside the edge, give every pocket clearance and every fold its extra length, place the holes once, then print at actual size and mock it up. A leather pattern is a set of flat pieces, each with its cut line, stitch line, holes and fold marks, drawn so the finished item fits what goes inside it.
What a leather pattern is
A leather pattern is the flat drawing you cut from. Unlike a sewing pattern for cloth, it is drawn at the finished size with no shrinking, pinning or easing later: leather does not gather, and a cut edge is final. So a good pattern carries more than the outline.
- The cut line of every piece, with the quantity to cut and the leather it is cut from (top, lining, keeper).
- The stitch line and every stitch hole, already spaced, so the holes in two layers meet.
- Fold lines and bar marks where the leather wraps hardware, drawn with the length the fold uses.
- Larger holes: buckle tongue holes on a strap, snap and rivet holes.
- A size check, such as a 50 mm square, so you can tell a true-size print from a shrunk one.
Patterns come as paper (PDF printed at 100 %), as vector files for a laser or cutting machine (SVG, DXF), or as a parametric file that is drawn again whenever a measurement changes.
Make a leather pattern in 7 steps
1. Measure the object the leather must hold
Start with the thing, not the leather. For a card holder that is the card: 85.6 × 54 mm (3 3/8 × 2 1/8 in), 0.76 mm thick. For a watch strap it is the gap between the lugs (22 mm on many watches; 9 to 30 mm exist), the width of the buckle, and the wrist. Write every size in millimeters; inches can be shown next to them later.
2. Decide the pieces and their layers
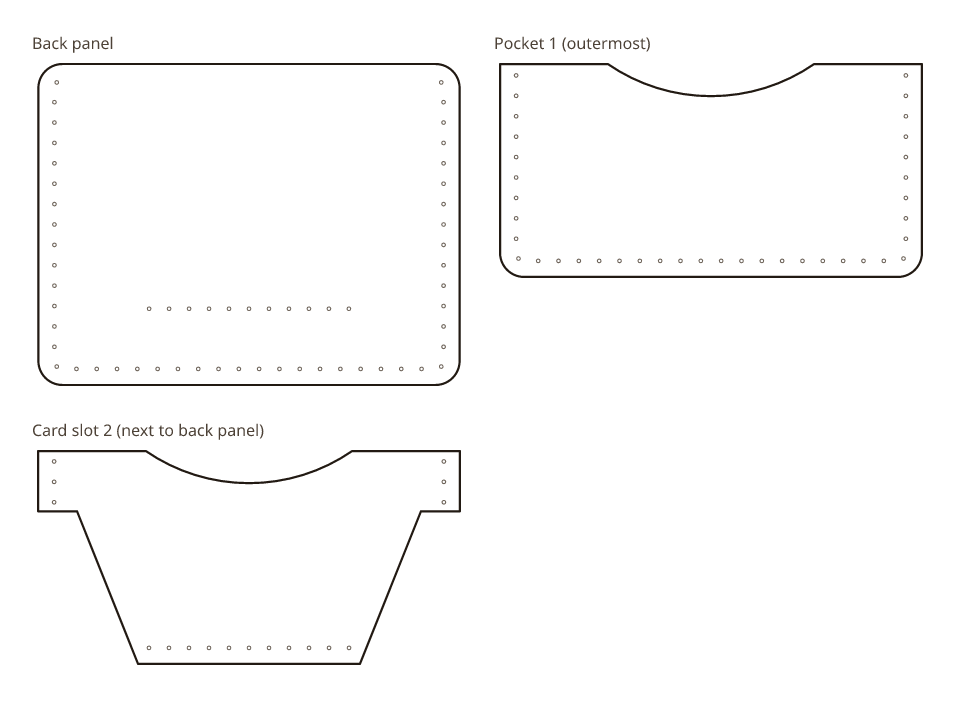
List each piece you will cut and what it is made of: top leather, lining, a keeper strip. The default card holder has 3 pieces (back panel, pocket 1 (outermost), card slot 2 (next to back panel)). The default lined watch strap has 6: two straps, two linings and two keepers.
3. Add the stitch line and the seam allowance
Draw the stitch line inside the cut edge. Small goods sit at about 4 mm from the edge; watch straps closer, around 3 mm. The leather between a hole and the cut edge must stay strong, so the stitch line never runs closer to the edge than the hole is wide.
4. Give every pocket room for what goes in it
A pocket is not the size of the card. The card holder's pieces are 105 mm (4 1/8 in) wide for an 85.6 mm card: the stitch line sits 4 mm inside each edge and 5.7 mm of clear space is left on each side of the card. A pocket meant to hold several cards needs more.
5. Let every fold use up length
Where the leather wraps a bar or folds on itself, the flat pattern must be longer than the finished piece. The default strap, 1.2 mm top leather around a 2 mm buckle bar, uses 5.9 mm (1/4 in) of extra length at the buckle and 4.3 mm (3/16 in) at each 1.5 mm spring bar. A pattern that mirrors holes across a fold line as if the leather had no thickness will not line up.
6. Place the stitch holes once, in the assembled piece
Space the holes along the stitch line at your iron's spacing (2.7 mm on the strap, 5 mm on the card holder by default), then copy the same holes to every layer that is sewn together. Two layers with their own hole rows will fight each other at the needle.
7. Print at actual size and mock it up
Print the pattern at 100 % and measure the 50 mm test square with a steel ruler before you cut. Cut the pattern in paper or card first, fold it, slide the cards in, and only then cut leather. Folds cannot be judged in paper, so mock up each fold in scrap leather of the working thickness.
Worked example: a two-pocket card holder
Take a standard bank card, 85.6 × 54 mm (3 3/8 × 2 1/8 in), held sideways, with two pockets on the front. The engine's default settings give these pieces.
| Piece | Cut size (width × height) | Stitch holes |
|---|---|---|
| Back panel | 105 × 80 mm (4 1/8 × 3 1/8 in) | 59 |
| Pocket 1 (outermost) | 105 × 53 mm (4 1/8 × 2 1/16 in) | 38 |
| Card slot 2 (next to back panel) | 105 × 53 mm (4 1/8 × 2 1/16 in) | 17 |
Stitch spacing 5 mm, holes 0.9 mm across, the stitch line 4 mm inside the cut edge. Leather 1.4 mm (3.5 oz) by default.
Why 105 mm and not 85.6 mm? Because the card needs 5.7 mm of clear leather on each side to slide in, and the stitch line needs 4 mm on each side to hold. The back panel is 80 mm tall so that the card shows 5 mm above the front pocket and can be gripped. None of these numbers is guessed from a photo; each follows from the card and the leather.
Why folds change the pattern
A flat pattern that folds around a buckle bar must be longer than the finished strap, because the leather travels around the bar. How much longer depends on the leather's thickness and the bar's diameter. On the default watch strap (1.2 mm top leather, 1 mm lining) the engine adds 5.9 mm (1/4 in) at a 2 mm buckle bar and 4.3 mm (3/16 in) at a 1.5 mm spring bar.
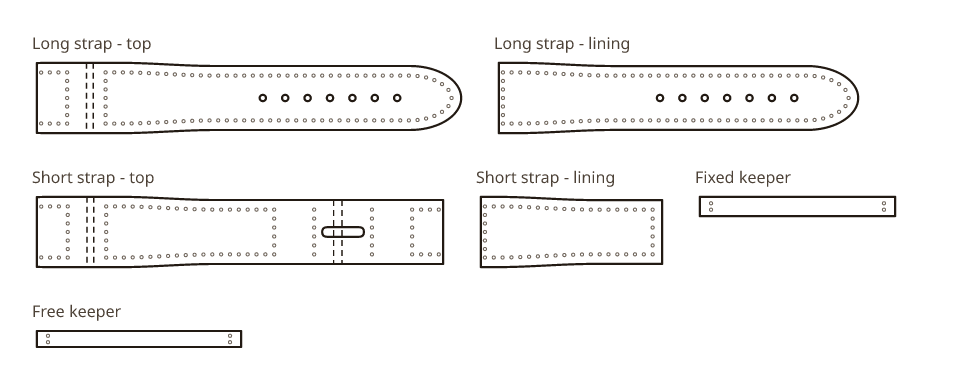
Holes on both sides of a fold are placed on the folded strap, then unfolded onto the flat pattern. Mirroring them across the fold line, as if the leather were paper, puts the hidden row a few millimeters off. The fold guide below explains the numbers and has a calculator for your own leather and bars.
Before you cut leather
- Print page 1 and measure the 50 mm square. It must read 49.8 to 50.2 mm on both sides.
- Cut the pattern in paper or thin card. Check the pieces against each other and against the object.
- Mock up every fold in scrap leather of the same thickness, around the real hardware. Paper cannot show what a fold uses up.
- Only then cut the good leather, and cut the biggest piece first.
Make a pattern from your measurements
Enter your card size, your watch's lug width or your wallet height, and the pattern is drawn as you type: cut lines, stitch holes and fold marks, in a printable PDF (US Letter or A4) with SVG and DXF files.
- See every patternCard holders, watch straps and a bifold wallet, each computed from your measurements.
Questions
What is the difference between a leather pattern and a leather template?
Makers use both words for the same thing: the flat drawing you cut from. Template often means a stiff copy (card, acrylic) that you trace around; pattern often means the paper or digital drawing. Either way it should carry the stitch holes and fold marks, not only the outline.
How much seam allowance does a leather pattern need?
Leather is not sewn and turned like cloth, so the allowance is the distance from the cut edge to the stitch line: about 4 mm on wallets and card holders and 3 mm on watch straps by default. Keep the leather between the hole and the edge at least as wide as the hole.
Can I draw a leather pattern by hand?
Yes. Measure the object, draw the pieces on graph paper with a steel ruler and a compass for corners, add the stitch line, and mark the holes with a wing divider or a pricking iron. The folds are the hard part by hand, because their extra length depends on leather thickness and bar size.
Why does my printed pattern come out smaller than the sizes written on it?
The print window was set to Fit to page or Shrink to printable area. Set it to Actual size or 100 %, print page 1 again and measure the 50 mm square before you cut anything.
Do I need to make a mock-up before cutting leather?
For anything with a fold, yes, and in scrap leather of the same thickness around your real hardware. Paper folds with no thickness, so it cannot show whether the holes on both sides of a fold will meet.
Related
Numbers from the card holder engine (pattern version 5.0.1) and the watch strap engine (pattern version 2.0.1). Updated October 25, 2026. More guides.