
How to make a leather card holder: pockets sized to the card
A card holder is sized from the card, not from a photo: for a standard 85.6 × 54 mm (3 3/8 × 2 1/8 in) bank card held sideways, every layer is cut 105 mm (4 1/8 in) wide. That is the card, plus 5.7 mm of clear space and 4 mm to the stitch line on each side. The front pocket is 53 mm (2 1/16 in) tall so 5 mm of card shows, and the back panel with two pockets is 80 mm (3 1/8 in) tall. This guide explains those numbers, the 6 ways to build a holder and the order of work.
The pocket math
Three numbers set a card pocket's width: the card, the clear space the card needs to slide, and the room the stitch line needs. 85.6 mm + 2 × (5.7 mm + 4 mm) = 105 mm. Cut the pocket to the card's own width and the card will not go in once the sides are sewn.
Heights follow the same idea. The front pocket is cut 53 mm tall so that the top of a 54 mm card shows by 5 mm and can be gripped. Each pocket behind it sits 15 mm higher, and the back panel rises above the last pocket, which gives 80 mm for two pockets per side.
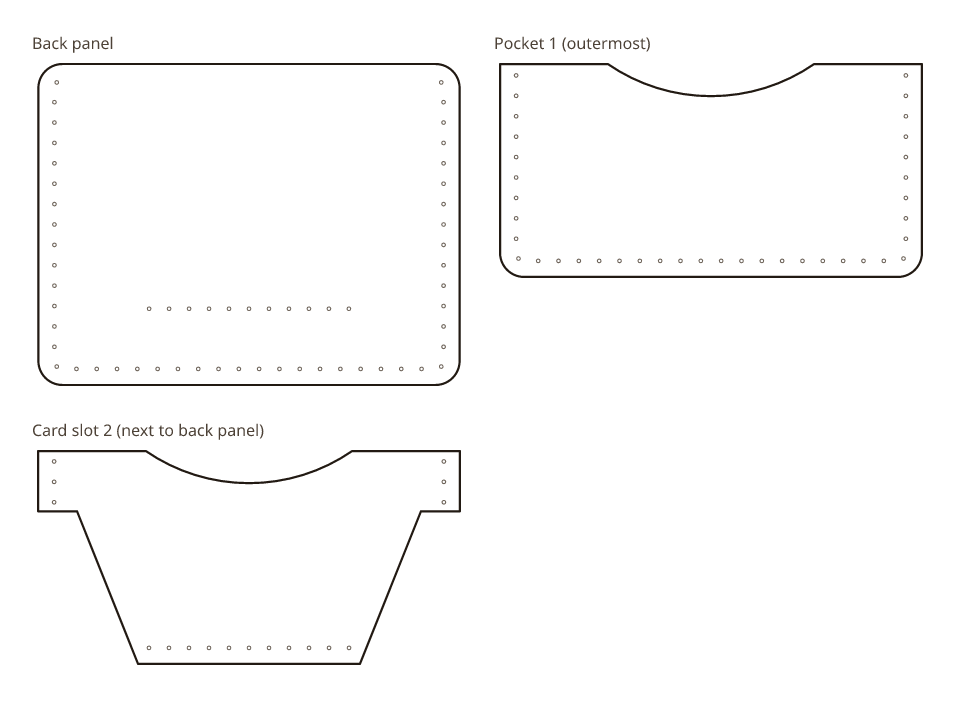
| Piece | Cut size (width × height) | Stitch holes |
|---|---|---|
| Back panel | 105 × 80 mm (4 1/8 × 3 1/8 in) | 59 |
| Pocket 1 (outermost) | 105 × 53 mm (4 1/8 × 2 1/16 in) | 38 |
| Card slot 2 (next to back panel) | 105 × 53 mm (4 1/8 × 2 1/16 in) | 17 |
Stitch spacing 5 mm, holes 0.9 mm across, the stitch line 4 mm inside every cut edge. Leather 1.4 mm (3.5 oz) by default.
Hold the card upright instead and the width becomes the card's short side plus the same allowances; the hub page lists the sizes for one, two and three pockets in both orientations. A pocket meant to hold several cards at once needs extra width, because the front layer has to climb over the cards at each side.
Stitch line and holes
The stitch line runs 4 mm inside every cut edge of the seam, in a U around the sides and bottom. The holes are spaced once along that line and shared by every layer, so the back panel and the pockets are punched in the same places; the default spacing is 5 mm. Each pocket's own top edge gets a short straight row where the pocket is sewn to the layer behind it.
Pre-punch every layer with a pricking iron along the printed line and pin the layers through two holes while the glue sets, or glue first and punch through all the layers. Either way, never punch each layer freehand: the rows will not meet.
6 ways to build a card holder
The pocket math is the same in every style; what changes is how the pieces are joined. Each style below is drawn by the engine at the default card and leather.
Layered
A back panel with stacked pockets, sewn around the outside. 3 pieces at the default card: back panel 105 × 80 mm (4 1/8 × 3 1/8 in); pocket 1 (outermost) 105 × 53 mm (4 1/8 × 2 1/16 in); card slot 2 (next to back panel) 105 × 53 mm (4 1/8 × 2 1/16 in). 114 stitch holes in all.
Flap with snap
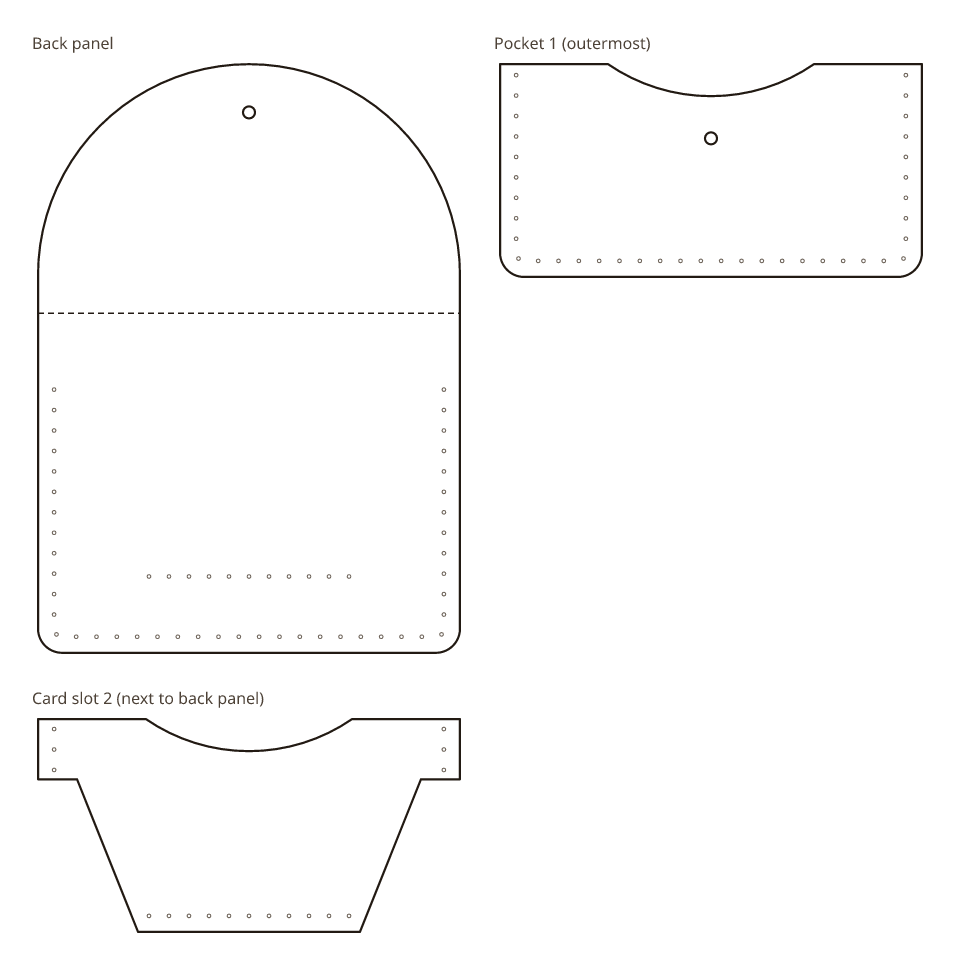
The back panel runs on into a flap that folds over the front pocket and closes with a snap. 3 pieces at the default card: back panel 105 × 146.5 mm (4 1/8 × 5 3/4 in); pocket 1 (outermost) 105 × 53 mm (4 1/8 × 2 1/16 in); card slot 2 (next to back panel) 105 × 53 mm (4 1/8 × 2 1/16 in). 110 stitch holes in all.
Bands
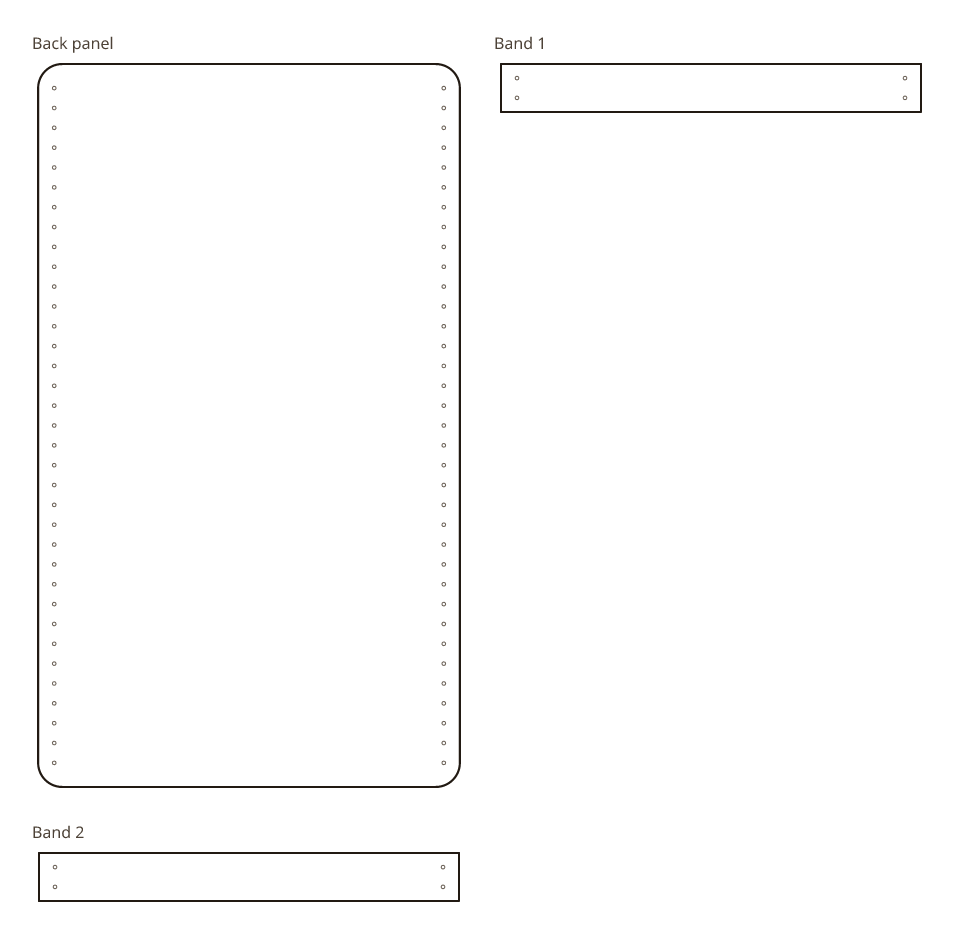
One long back panel with leather bands sewn across it; the cards slide under the bands. 3 pieces at the default card: back panel 105 × 180 mm (4 1/8 × 7 1/16 in); band 1 105 × 12 mm (4 1/8 × 1/2 in); band 2 105 × 12 mm (4 1/8 × 1/2 in). 78 stitch holes in all.
Side-entry
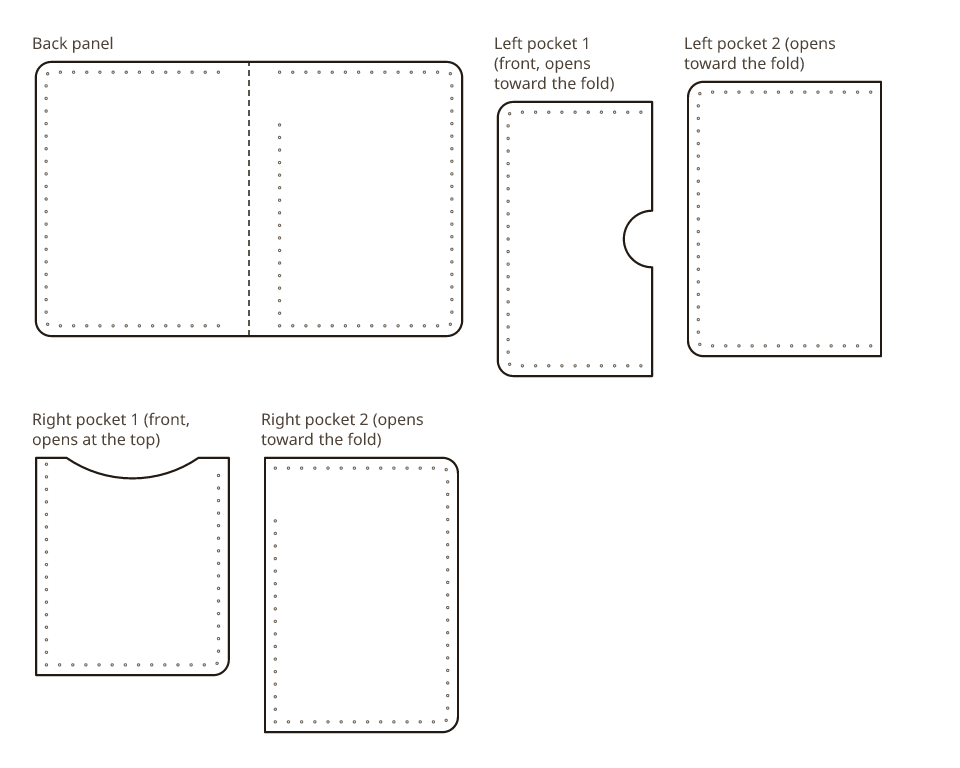
A wallet that folds in the middle, with two card columns; pockets open toward the fold or at the top. 5 pieces at the default card: back panel 165.8 × 106.6 mm (6 1/2 × 4 3/16 in); left pocket 1 (front, opens toward the fold) 60 × 106.6 mm (2 3/8 × 4 3/16 in); left pocket 2 (opens toward the fold) 75 × 106.6 mm (2 15/16 × 4 3/16 in); right pocket 1 (front, opens at the top) 75 × 84.6 mm (2 15/16 × 3 5/16 in); right pocket 2 (opens toward the fold) 75 × 106.6 mm (2 15/16 × 4 3/16 in). 306 stitch holes in all.
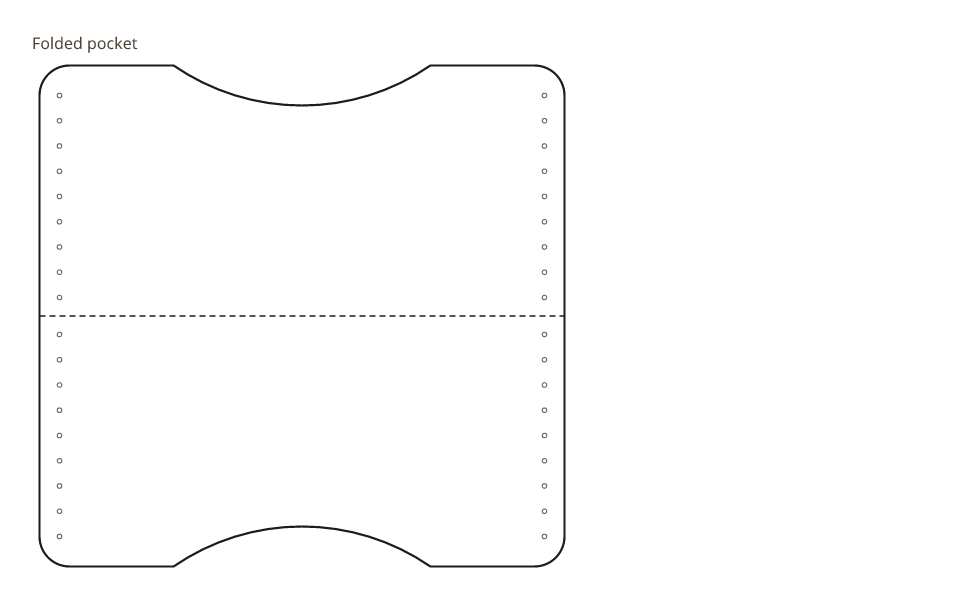
Folded pocket
One piece folded in half and sewn along its open edges. One piece at the default card: folded pocket 105 × 100.2 mm (4 1/8 × 3 15/16 in). 36 stitch holes in all.
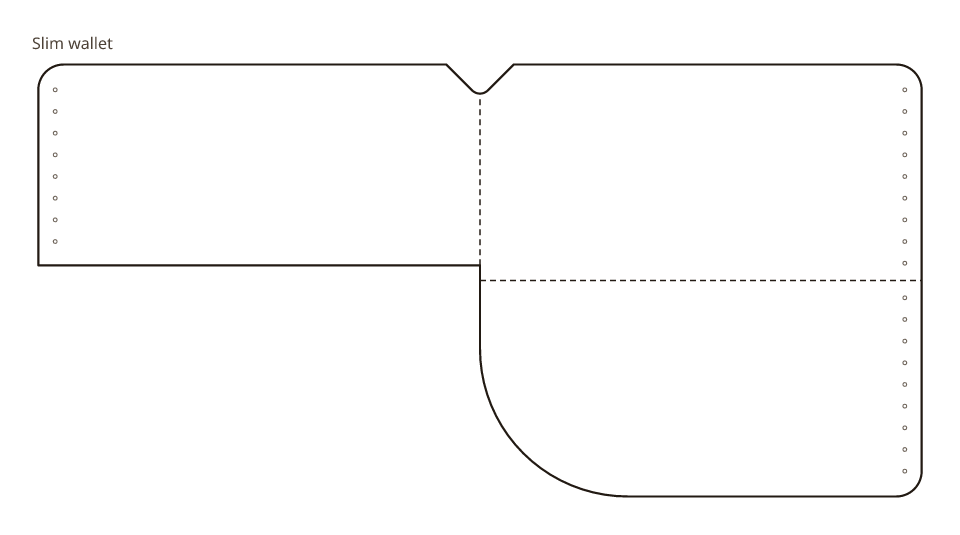
Folded slim wallet
One piece of three panels: fold the side panel behind, then the bottom panel up behind it, and sew the closed edge. One piece at the default card: slim wallet 209.4 × 102.4 mm (8 1/4 × 4 1/16 in). 26 stitch holes in all.
Leather thickness
Card pockets want thin leather: two or three pockets plus the back panel is sewn through at the edge, and every layer adds its thickness there. Keep pockets at 1.2 mm (3 oz) or thinner and the holder stays slim. The folded styles are drawn for a thickness you enter, from 0.8 mm to 2 mm, starting at 1.4 mm (3.5 oz), because a fold uses up length and thicker leather uses more.
Order of work
- Print page 1 at 100 % and measure the 50 mm square. Cut all pieces in paper first and check that your card slides into the paper pocket.
- Cut the leather pieces, biggest first. Mark the stitch line with a wing divider or trace the printed holes.
- Finish the top edges of the pockets now, while they are still open: bevel, burnish or paint. They cannot be reached later.
- Punch the holes in every layer along the printed line, or glue first and punch through all the layers.
- Glue the pockets to the back panel in order, front pocket last, and pin through two holes while the glue sets.
- Saddle stitch the U seam through the shared holes, backstitch two holes at each end, and finish the outside edges together.
Make your card holder pattern
Enter your card size, pick one of 6 styles and 1 to 3 pockets per side, and the pieces are drawn as you go. The download has a printable PDF (US Letter or A4) with the 50 mm square on every page, plus SVG and DXF files.
- Open Card holder · CustomEvery setting: 1–3 pockets per side, 6 styles and 19 pocket edge shapes.
- Open Card holder · ClassicThe traditional card holder: just your card size and one of 4 pocket edges.
Questions
How wide should a leather card holder be?
For a standard 85.6 mm bank card held sideways, 105 mm: the card plus 5.7 mm of clear space and 4 mm to the stitch line on each side. Held upright it is the card's 54 mm side plus the same allowances.
How tall is a card holder pocket?
The front pocket is cut 53 mm tall by default, so 5 mm of a 54 mm card shows above it. Pockets behind it step up by 15 mm each.
What stitch spacing is used on a card holder?
5 mm by default, with 0.9 mm holes, the stitch line 4 mm inside the cut edge. Pricking irons come in set spacings, so the generator lets you enter your iron's spacing and spaces the holes to fit it.
What leather thickness is right for a card holder?
Pockets up to 1.2 mm (3 oz) keep the edge thin. The folded styles are drawn for the thickness you enter, 0.8 mm to 2 mm, since the fold uses up length.
Does the pattern work for a card that is not a standard bank card?
Yes. Enter the card's width and height (80 mm to 92 mm wide, 48 mm to 60 mm tall) and every piece is drawn again for it.
Related
Numbers from the card holder engine (pattern version 5.0.1). Updated October 25, 2026. More guides.